How to Set Up a Custom Domain for Your Printify Pop-Up Store & Appear in Google Searches
FREE if you already own a personal domain

👀 Check out my EXAMPLE website 👀
Why Use a Custom Domain
- Brand Credibility: A custom domain like "
mybrand.com" looks far more professional and trustworthy than "mybrand.printify.me" helping to build customer confidence. - Search Engine Visibility: With a custom domain, it is possible to set your website up to appear in Google search results.
- Custom Overlays: With a custom service worker, you can add unique (but limited) design elements and overlays.
- Enhanced Security & Analytics: By using Cloudflare, you gain robust security features such as DDoS protection and SSL encryption, along with valuable traffic analytics to understand your audience better.
✔️ Before we dive in, make sure you’ve already set up your Printify pop-up store. Also, if this guide helps you out at all, consider supporting me by buying something from my own store and/or following me on X (@swagcomputer). I'm a fellow struggler just like you.
Step 1: Purchase or Obtain a Custom Domain
The first step is securing a custom domain name. Ideally, you’ll want a domain that represents your brand well and is easy for customers to remember. I personally used Spaceship.com (not an affiliate link) to buy my domain, but there are plenty of other options like GoDaddy or Namecheap.
If you’re on a tight budget and need a free domain, there are some alternatives, although I don’t recommend them if you’re trying to build credibility. Services like Freenom might offer free domain names, but they often come with limitations. Consider investing in a paid domain for the best results.
Step 2: Create a Cloudflare Account
Setting up a Cloudflare worker is free (for up to 100,000 daily requests) and easy-to-use. To get started:
- Visit Cloudflare’s website and sign up for an account.
- Once signed in, click “Add a Domain" and enter your domain name (e.g., swag.computer). You can go through the steps and sign up for the Free plan to start out.
- Cloudflare should automatically scan your DNS records.
Step 3: Change Your Domain’s Nameservers
Cloudflare will provide two nameservers to replace the ones currently set for your domain. This step connects your domain to Cloudflare:
- Log in to your domain registrar (e.g., Spaceship, GoDaddy, or Namecheap).
- Navigate to your domain’s DNS or Nameserver settings.
- Replace the existing nameservers with the ones provided by Cloudflare.
Changes can take a few minutes to 24 hours to propagate, so don’t worry if it doesn’t work immediately.
Step 4: Configure Cloudflare Worker
Now let's dive into the secret sauce connecting and configuring your Cloudflare Worker:
-
Create a Worker:
- In your Cloudflare dashboard, navigate to the sidebar and click on "Workers & Pages". It’s likely under the 'Compute (Workers)' section, but note that Cloudflare changes their UI frequently.
- Click Create, then select Create Worker. You can deploy it as is for now.
- Once the worker is created, hit Continue to Project and Click on the Settings tab.
-
Set a Custom Domain:
- In the Worker settings, under Domain & Routes add a Custom Domain.
- Set it to your own domain. For me I set it to
swag.computer.
Step 5: Generate an API Key and Find Your Shop ID
To fully integrate with Printify, you’ll need an API key and your shop ID:
-
Generate an API Key:
- On your Printify dashboard, go to the sidebar, scroll down, and click on Account, then select Connections.
- Under API Tokens, click Generate.
- Enter a token name like
SWAG_FULL_ACCESS_CLOUDFLARE, select Full Access, and click Generate Token. - Copy the generated token to your clipboard (it’s a long key).
-
Find Your Shop ID:
- The easiest way is by navigating to the Orders page in your Printify dashboard. The URL will look like this:
https://printify.com/app/store/12345678/orders/1. - Your shop ID is the number in the URL, e.g.,
12345678. - If the UI changes in the future, you will likely need to call the API to find your shop ID. One way you can do that:
- Install an extension like ModHeader.
-
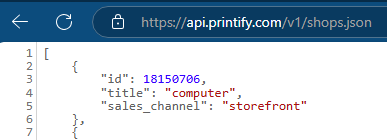
Go to
https://api.printify.com/v1/shops.jsonand add a header with the nameAuthorizationand the valueBearer {YOUR_API_KEY}(Don't include brackets). You should get a response like the following - After retrieving your shop ID, make sure to remove the header from your extension because it could mess with Printify or other web apps
- The easiest way is by navigating to the Orders page in your Printify dashboard. The URL will look like this:
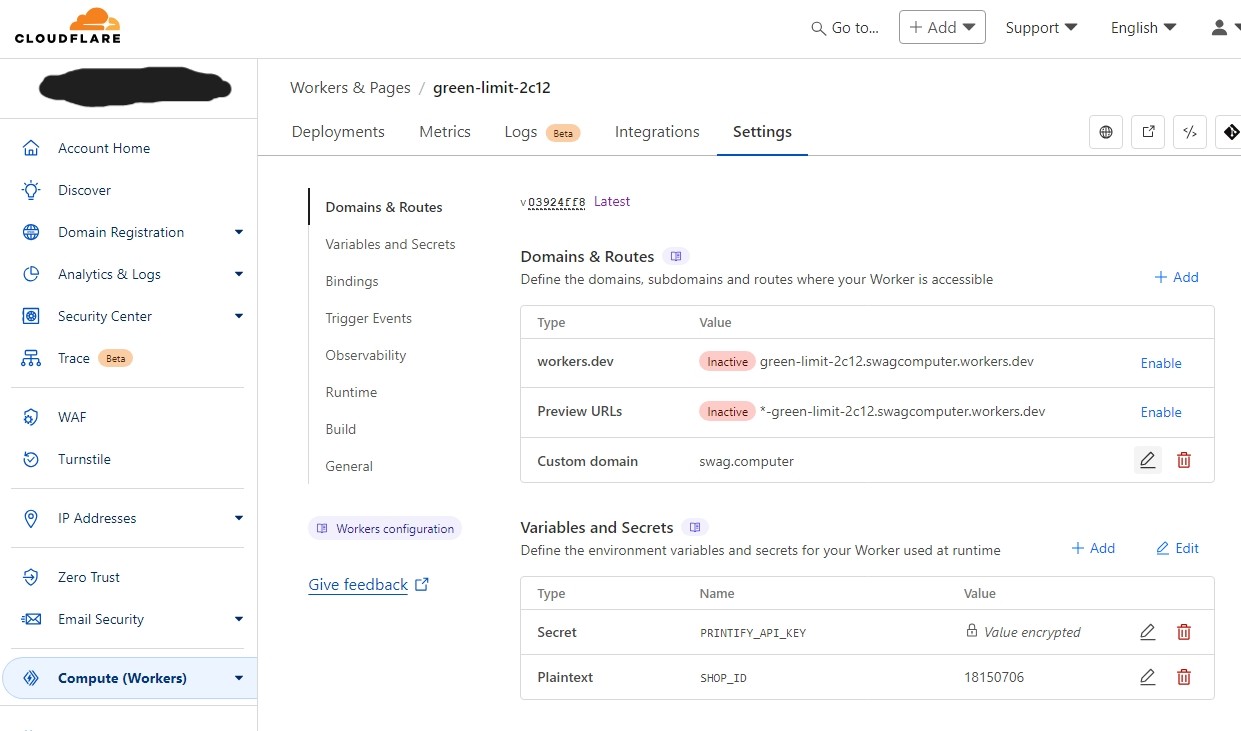
Step 6: Add Environment Variables to Your Worker
- In your Cloudflare Worker settings, under Variables and Secrets, click + Add.
-
Add the following variables:
- Type: Secret, Variable Name: PRINTIFY_API_KEY, Value: Your API key
- Type: Text, Variable Name: SHOP_ID, Value: Your shop ID
Step 7: Edit Your Worker Code
Now we can get into editing our service worker code. In the top-right corner of the Worker page, click Edit Code (it might look like an icon with angle brackets). This will open an online code editor. On the left of the code editor, you will need to expand the file explorer. I divided my code into 3 files, let's first
take a look at editing the worker.js file.
Below is a sample code block that you can use for your own worker:
//worker.js
import { sitemapContent, robotsContent } from "./data.js";
import { html } from "./html.js";

async function handleRequest(request, env) {
  const url = new URL(request.url);
  let pathname = url.pathname;
  let productData = [];
  const shopId = env.SHOP_ID;
  const apiKey = env.PRINTIFY_API_KEY;

  if (pathname === "/cart") {
    pathname = "/products";
  } else if (pathname === "/robots.txt") {
    return new Response(robotsContent, {
      headers: { "Content-Type": "text/plain" },
    });
  } else if (pathname === "/sitemap.xml") {
    return new Response(sitemapContent, {
      headers: { "Content-Type": "application/xml" },
    });
  }

  try {
    const apiUrl = `https://api.printify.com/v1/shops/${shopId}/products.json`;
    const response = await fetch(apiUrl, {
      headers: {
        Authorization: `Bearer ${apiKey}`,
      },
    });

    if (response.ok) {
      const data = await response.json();
      productData = data.data.map((item) => ({
        title: item.title,
        description: item.description,
        tags: item.tags,
      }));
    } else {
      console.error(`Error fetching data: ${response.statusText}`, {
        status: response.status,
      });
    }
  } catch (error) {
    console.error(`Error: ${error.message}`);
  }

  const targetPath = pathname === "/" ? "/products" : pathname;

  if (
    targetPath === "/products" ||
    targetPath === "/cart" ||
    targetPath.startsWith("/some-other-path")
  ) {

    function renderProductListHTML(products) {
      return products
        .map(
          (product) => `
          <div class="product-item">
            <h3>${product.title}</h3>
            <div>${product.description}</div>
            <ul>
              ${product.tags.map((tag) => `<li>${tag}</li>`).join('')}
            </ul>
          </div>
        `
        )
        .join('');
    }

    const preRenderedHTML = renderProductListHTML(productData);

    const htmlResponse = html
      .replace(/{{origin}}/g, url.origin)
      .replace(/{{path}}/g, targetPath)
      .replace(/{{productData}}/g, preRenderedHTML);

    return new Response(htmlResponse, {
      headers: {
        "Content-Type": "text/html",
        "Cache-Control": "no-cache, no-store, must-revalidate",
        "Pragma": "no-cache",
        "Expires": "0",
      },
    });
  }

  return new Response("Not Found", { status: 404 });
}

export default {
  async fetch(request, env) {
    return handleRequest(request, env);
  },
};
As you can see, there is plenty going on in the code here, and I won't explain it all, but the most important thing to note is that it handles routing for pages like robots.txt and sitemap.xml (importnat for SEO) and will also
take the list of all your products fetched from the Printify API and convert it into HTML. This is crucial for web crawlers to index your content so it appears in search results.
Step 8: Add Your 'data.js' File
Create a new file named data.js in your Cloudflare Worker editor and add the following code:
//data.js
export const robotsContent = `
User-agent: *
Allow: /
Sitemap: https://{your.domain}/sitemap.xml
`;

export const sitemapContent = `
<?xml version="1.0" encoding="UTF-8"?>
<urlset xmlns="http://www.sitemaps.org/schemas/sitemap/0.9">
  <url>
    <loc>https://{your.domain}/</loc>
    <changefreq>daily</changefreq>
    <priority>1.0</priority>
  </url>
  <url>
    <loc>https://{your.domain}/products</loc>
    <changefreq>daily</changefreq>
    <priority>0.9</priority>
  </url>
  <url>
    <loc>https://{your.domain}/cart</loc>
    <changefreq>daily</changefreq>
    <priority>0.8</priority>
  </url>
</urlset>
`;
After pasting the code, make sure to replace {your.domain} in the above code with your actual domain.
Step 9: Add Your html.js File
Create another file named html.js. This file contains the actual structure of your website. This piece is going to need the most customization, so it might
come in handy knowing some HTML/CSS. After you paste the code below, you will need to make sure to replace the data where it says:
- LINK TO YOUR FAVICON
- YOUR TITLE
- "YOUR DESCRIPTION"
- "CHOOSE, YOUR, KEYWORDS"
- The seo-content div (this data won't actually appear on your page, but is only meant for the web crawlers).
- YOUR_PRINTIFY_WEBSITE_PREFIX
- The transparent-corner div with your own custom overlay
//html.js
export const html = `
<!DOCTYPE html>
<html lang="en">
  <head>
    <meta charset="UTF-8" />
    <meta name="viewport" content="width=device-width, initial-scale=1.0" />
    <link rel="icon" href="LINK TO YOUR FAVICON" type="image/x-icon" />

    <!-- SEO Meta Tags -->
    <title>YOUR TITLE</title>
    <meta name="description" content="YOUR DESCRIPTION" />
    <meta name="keywords" content="CHOOSE, YOUR, KEYWORDS" />

    <!-- Additional SEO Meta Tags -->
    <meta name="robots" content="index, follow" />
    <link rel="canonical" href="{{origin}}{{path}}" />

    <style>
      body { margin: 0; padding: 0; overflow: hidden; height: 100%; }
      iframe { border: none; width: 100%; height: 100vh; }
      .seo-content { position: absolute; left: -9999px; width: 1px; height: 1px; overflow: hidden; }
      #transparent-corner { position: fixed; right: 25px; bottom: 20px;
         width: 120px; height: 25px; z-index: 9999; opacity: 0.7; display: none; }
      #transparent-corner img { display: block; }
      @media (max-width: 768px) {
        #transparent-corner {
          display: none !important;
        }
      }
    </style>
  </head>
  <body>
    <div class="seo-content">
      <h1>HEADER</h1>
      <p>PARAGRAPH EXPLAINING CONTENT</p>
      <h2>ANOTHER HEADER</h2>
      <ul>
        <li>LIST ITEM 1</li>
        <li>LIST ITEM 2</li>
        <li>LIST ITEM 3</li>
      </ul>
      <h2>LAST HEADER</h2>
      <p>LAST PARAGRAPH</p>
    </div>

    <iframe src="https://YOUR_PRINTIFY_WEBSITE_PREFIX.printify.me{{path}}" frameborder="0"></iframe>

    <div id="product-list" class="product-list">{{productData}}</div>

    <div id="transparent-corner">
      <a href="https://swag.computer" target="_blank">
        <img
          src="https://images-e2r.pages.dev/internet-computer-white.png"
          alt="Internet Computer badge"
          style="width: 100%; height: 100%; object-fit: contain;"
          onload="this.parentElement.parentElement.style.display = 'block';"
          onerror="this.parentElement.parentElement.remove();"
        />
      </a>
    </div>
  </body>
</html>
`;
Step 10: Deploy and Test
Once you have all three files ready to go, click Deploy in the Cloudflare Worker editor.
Visit your custom domain to test the setup. If everything is configured correctly, your Printify store should load as expected! You should also be able to navigate to:
- https://{your-domain}.com/sitemap.xml
- https://{your-domain}.com/robots.txt
If you want to further optimize your html page for search engines, I would also suggest you ask AI for some advice on how to edit the html page. It may tell you to include things like Open Graph Tags and Twitter Card Tags.
Step 11: Register Your Page with Google Search Console
To ensure your site appears in Google search results, you will need to register with Google Search Console:
- Visit Google Search Console and log in with your Google account.
- Click Add Property, choose the Domain option, and enter your domain (e.g.,
mydomain.com). - Copy the provided TXT record and add it to your domain's DNS settings in your registrar (e.g., GoDaddy, Namecheap). Return to Search Console and click Verify.
- Navigate to the Sitemaps section, enter the URL of your sitemap (e.g.,
https://{your-domain}.com/sitemap.xml), and click Submit.
That’s it! Google will begin indexing your site, and you can monitor its performance in the dashboard.
It may take a while for you to appear in any Google searches, but the first time it worked for me I could hardly believe my eyes 👀
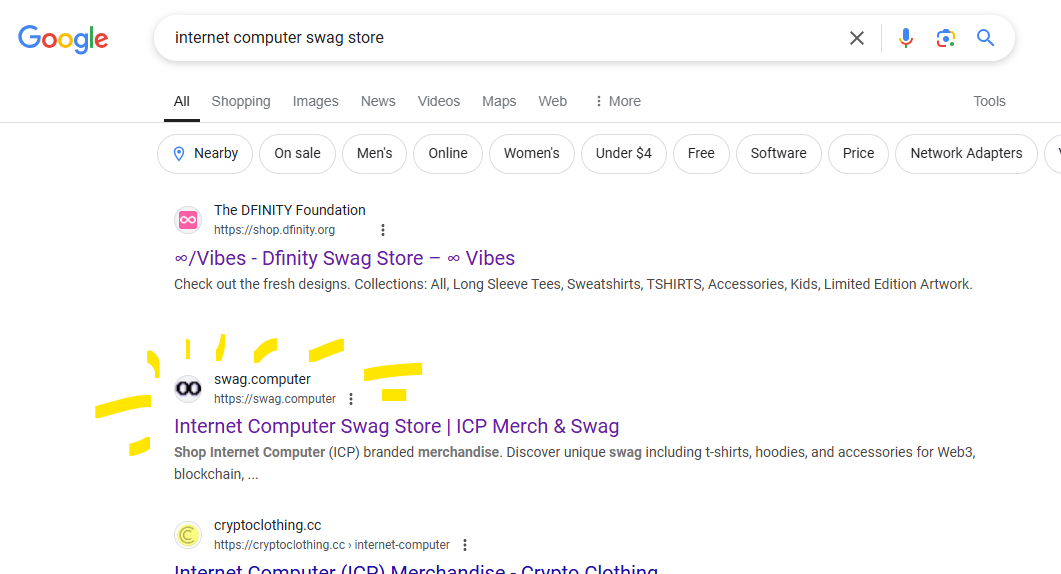
To make sure it is showing up in Google, you can enter in the search bar something along the lines of site:swag.computer merch and it will only show search results from that site specifically with the 'merch' keyword.
In Conclusion
So... that was a lot more setup than I remembered, sure to cause a few headaches, but with the limited configuration options of Printify pop-up stores, it’s absolutely worth having a custom domain and being able to appear in Google search results.
Connecting a custom domain via Cloudflare is a cost-effective way to improve your store’s professionalism and functionality, and so I hope you found all of these steps helpful and worth it.
🎉 Good luck with your store, and don't forget to follow me @swagcomputer!